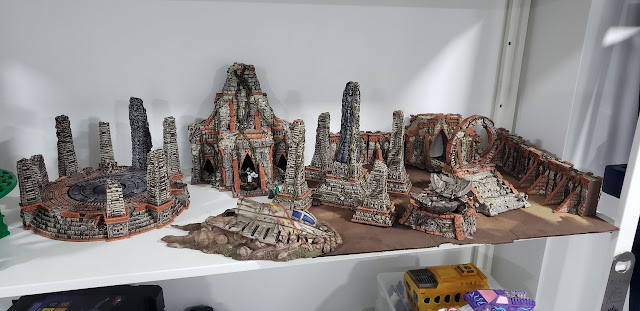
A couple of years back a friend of mine gifted me with a BOX full of 3D printed terrain. I'm finally getting around to working on it. There was a delightful mix of stuff in it, from the alien ruins I'm sharing today from Printable Scenery, a couple small shuttles from 2nd Dynasty, and a bunch of city terrain from Flatline City.
I'm nearing the end of the New Eden ruins, and wanted to share how it looks, before showing off the side project this set has inspired. This piece right here is the Mortis Simulacrum, and it shows off how I went about painting all of these terrain pieces. I took inspiration (ripped off) the official paint scheme from the web site. I started by priming it with Rust-oleum matte brown spray paint, and then gave it a heavy dry brush of Craft smart (from Michael's craft store) Antique White.
You really don't want to be using your good paints on big pieces of terrain like this. It's much better to a big 2oz bottle that costs less than a dollar rather than the 0.5oz bottle that costs $3.69.

After all that dry brushing, it's time for the terracotta accents. Again, this is the cheap craft smart craft paint.
Finally it's time to paint the vines. Here's where I did exactly what I just got finished telling you not to do, and I used Reaper's Olive Drab. Why? Because I didn't pick up a green paint last time I was at the craft store and I didn't want to let that stop me. I'm very much in a "Any Progress is better than No Progress" phase right now, and wanted to keep knocking these out.
I did decide to do one thing different with this piece, which was to paint the central column figure as if it was a metal cladding over the stone. I got the idea from the piece below, and decided that since it looked very similar I'd do it on this one too. So the areas that were to be metal got painted black, and then dry brushed with Reaper's Blade Steel followed by a feathery light dry brush of Filigree Silver.
You'll note the missing column above... It broke off, and my attempts to re-glue it failed, so I left it as a hole. I did add some gravel to make it look less like a 3D printed void. You'll see the broken piece in another post later this month.
And here's the whole set that's painted so far. I'll be getting it onto a table soon, and you'll see just how well this can cover a 3x3 table. There are a couple more pieces to add to it, and I expect to get them done soon. More to come!


No comments:
Post a Comment
Comment Moderation is in place. Email notifications are spotty... might be a bit before this gets published. Sorry.