Pages

Thursday, December 31, 2020

December in Review

The pandemic continues. Work has been slammed, especially as my boss and I are trying to get things wrapped up before I take my paternity leave. The holiday was quiet. Not being able to see family and friends puts a damper on things, and the little one is too small to get what’s going on. I didn’t get a tree or even a wreath. 


I did get a bunch more time to watch things, and a surprising amount of hobby time. 


Gaming

All gaming is on pause. With the arrival of my son, there just isn’t the time or the energy. I haven't even had the brain power to write up session reports... need to get back to that. 


Miniatures

This has been a surprisingly productive month. I finished Father Christmas, as well as the chronoscope Bones minis Cyber Troll and Space Henchman, and got a solid start on a few other figures in anticipation of Stargrave in April. 


3 minis might not sound like a lot, and really, it isn’t. However I also built a cardboard spaceship. As I write this, the primer coat is drying on it, and painting will commence soon! 


Media

Movies/TV Watched

Star Trek Discovery, season 3

Star Trek DS9, season 3-4

Star Wars Clone Wars seasons 5-7

Star Wars Rebels

Muppets Christmas Carol

George C Scott Christmas Carol

Mickey’s Christmas Carol

Charlie Brown Christmas

A Christmas Story


Books Read

Gideon the Ninth - SO GOOD!!


Goals

Survive the pandemic

Get through the next week of work, ad enjoy the following 12 weeks of paternity leave

Paint the cardboard starship Paint the other sci-fi minis I've primed


Wednesday, December 30, 2020

Hobby Tray Upgrade

For a couple years now I've been using this tray to do all my hobbying on. The edge was always kind of annoying, but I draped it with a couple of washcloths/hand towels to rest my wrists on. It wasn't the most comfortable, but it worked. The major downside was the fact that they weren't at all secure, and I'd find myself having to fix their placement pretty often. 

For a while now I've been debating what to do about it... then I got a new couch cover, and it came with these foam pieces that I guess are supposed to be stuffed in to help keep the cover in place. 

But I decided they'd be better used on my tray. So I slit them down the middle, and stuffed them over the edge of the tray. They didn't want to stay put either, so I pulled out the hot glue gun, and...


and now it's way more comfortable. We'll see how well they last over the long term. And at my wife's suggestion, I added the foam to both long edges of the tray, so even when one side starts to fall apart, I can now just turn the tray around! 

Tuesday, December 29, 2020

Cardboard Spaceship for Stargrave part 1

While Stargrave is still months from being released, there has been some info that's made it out into the wilds, and one bit is that there will be a scenario that takes place in a hanger bay of some sort, and requires 4 ships/shuttles. 


Now, I've been watching a lot of Star Wars lately, from Clone Wars to Rebels to The Mandalorian, and got this crazy idea to scratch build a small cargo ship. I even dreamed about it. So, after work one evening I got to it. 

I started with a sketch and some basic dimensions.

Then got cutting. Mostly the ship is made from regular cardboard, glued together with hot glue.
Here I've got the basic structure coming together.
And then the overall ship shape.

The basic construction took about 2 hours tops. I was really pleased, overall with how it was coming along.... but then I got more into it and... 

When I got the second engine on... I realized that they weren't quite the same size. I did a bunch of fiddling trying to get it to work.
Then ignored it, and added more structure to the top of the ship.
This is the top of that little 3 legged thing that comes with pizza to keep the box from squishing the pizza. Loved the shape, and figured that'd be great detailing for the ship.
Then I cut off the engines and replaced them with these cylinders made from tissue box and a pair of Reaper bases.

You can also sort of see the pencil sketching on the hull where I thought different bits of plating should go. 

And speaking of, I got started on it. Here you can see the hatch on the port side. The paneling was done with the same tissue box card applied with wood glue.

 The paneling was a bit too busy, and I'm not real thrilled with how it looks here. Maybe it'll be better when painted.

Up top, I'm wishing I'd been more symmetrical with the panels.
I went with a cleaner, less busy look for the starboard side.
And here you can see the aft main hatch.
Adding detail to the prow and the front of the engines. Still not sure how I'll detail the rear of the engines.
Working on some landing gear. They're made from GW 20mm bases, kabab skewers, and the inner tube of a roll of dog poop bags.
Given how tall it is, I added some washers for weight to the bottom of the hull.
And here I'm adding the clear plastic to the cockpit. I want the smooth surface for when I paint it up. 

Then I built out the cockpit cladding and here you can see the fins added to the engines...

And the detail added to the back of the engines. 


Then it was primer time!! It's gonna need a second coat, and then onto painting, but that's for another post. 

Saturday, December 26, 2020

Merry Christmas!

It's a weird year, but we're almost through it. I'm so looking forward to once again being able to see my friends, roll some dice, and not worry about getting or spreading the plague. 

by sandra

I hope you're all safe and healthy, and have lots of gaming to look forward to in the near future.

Tuesday, December 15, 2020

Retro-Review: Star Wars: Return of the Jedi

Back to my Star Wars reviews... 

The conclusion of the original trilogy!

After the bit of a downer end of ESB, we find our heroes rescuing their friend Han from the clutches of Jabba the Hut. As with the entirety of the original trilogy, the practical effects, the puppetry, and the shooting locations help ground this movie in a way that to many modern movies and shows fail at.

One thing I'd specifically like to take a moment to comment on is Slave Leia, or, most appropriately, Hut Slayer Leia!! Carrie Fisher does such a wonderful job in her role as Princess Leia. I really love how over the years she embraced the fandom, in spite of her own difficulties. She really did become the space mom we all need, flipping off the haters, and spreading love and glitter wherever she went.

RotJ does suffer a little, coming after the powerful ESB, but it makes the best of it, hitting all of the powerful beats it needed to. Luke going off to confront his father and the emperor, the struggle in the throne room as he watches his friends fighting and dying, the moment of temptation as he reaches for his lightsaber in anger, and of course the redemption of Anakin Skywalker.

Then there's the ewoks. I get that they aren't the most impressive things in the universe, but they are kinda impressive in not only how they helped to take down the empire, but in how they had so many traps ready for the fight!

The original celebration on the forest moon of Endor is added to in the new version that shows celebrations on planets all over the galaxy. While I appreciate them showing it that way, it fails to blend in as seamlessly as I'd like.  

All in all this is a satisfying conclusion to the trilogy. 


Next up: The Force Awakens!

Monday, December 14, 2020

Games Workshop Skulz Adeptus Mechanicus Servitor

Way back in the 90's, Games Workshop had a rewards program where if you collected certain number of "Skulz" you could redeem them for cool stuff.
 
I missed most of this, and never earned enough skulz to collect anything, but I somehow managed to get my hands on the little servitor that came with the 100 skulz Adept Mechanicus set. I don't know where he came from, or when I got him, but a little while back I noticed him while digging through a random bag of mostly Space Marine bits.


So I decided to paint him. One interesting thing about him is how subtle he is as compared to so many other GW minis. He isn't over sculpted, garishly decorated with too many cogs and skulls. Sometimes less is more.

As usual, I started with a warm soapy scrub with my hobby toothbrush, then glued him to the top of one of my homemade painting handles. I primed him black, and got to work. He was a quick single evening bit of fun, and an uncomplicated paint job, but sadly I didn't keep track of which paints I used on him, but I'm going to make best guesses...
 
The chest was a blade steel, with dragon gold accents. The face was tanned flesh and scholar flesh. the hair was the red hair triad. The book and boots were painted as black leather. The pages were painted with a sand color. I don't remember what red I used on the robe.


Then it was time to decide how to base him... that took a little longer. But in the meantime, to give you a good idea of just how small he is....

TINY!!


But back to basing. I've been watching a lot of youtube terrain videos, and decided to put some of that to good use. I started with a used up gift card, and started cutting...


Aiming for some sort of futuristic deck plating...


After the glue was dry, I trimmed it to the edge of the base. No need for it to extend over the base. I added that little step area at the back to help fill in the space, since he's such a little dude. I didn't want him to look lost on a big empty base.

Then I added a bead and a bit of floral wire. Drilled some holes to add texture to the otherwise flat panels.


Then some more wire...


 Placement looks good. Time to get it painted. 

Primed black, drybrushed with styryz metal primer. Added hazard stripes to the side of the raised area, and painted the wires with red, yellow, and green. The bead I painted to look like it's maybe glowing?


For a quick little project, I'm rather pleased with the results.

Tuesday, December 8, 2020

Reaper Bones Goblins

With the massive box that was Bones 4, I got a bunch of goblins. Now, I've already painted a bunch of Reaper Bones goblins, and a bunch before that, but these are new sculpts, and I wanted something relatively easy to work on, so.... goblins. 

 As usual,  I started by washing the minis in warm soapy water with my hobby tooth brush. Unlike most of the time though, I didn't glue the minis to their own bases, but instead I hot glued them to some craft sticks. Since I'm working on only 4 sculpts (out of 6) and 4 of each of the sculpts, I wanted to make assembly line work of them. 

An additional difference this time is that I didn't use my usual brown liner on these guys. I've been watching Anne Forester on Reaper, and she doesn't with her bones minis, so I wanted to give it a try.

If you look closely, you'll notice that there's a single white goblin among the grey goblins. That's because these minis first came out in Bones 3 where I got one of each sculpt, and then you get a ton (4 each) more in Bones 4. 


Each of the goblins on the sticks is going to get a bit of some color to help them look different from one another. I used yellow, green, red, and blue. It maybe isn't the most realistic, but when using them on the table it's easy to say "the green gobbo with the 2 handed sword" or "the red sword and board goblin"

For skin, I decided to go with Reaper's Goblin skin paint, and used a bit of Ogre skin for highlight. Now, I did my pathfinder goblins in green, but for my regular D&D goblins, I really do prefer the more orange type color. Plus they go well with the blueish orcs I tend to paint.  

Going in I used ebony flesh on most of the leather bits and the wooden parts. I highlighted some of them with ruddy flesh. I used linen white and holly red on the eyes, and blade steel on the weapons and metallic armor bits.


Then it was time for basing! I popped each goblin off the craft stick, and super glued them onto Reaper's 1" RPG bases. I really like the straight sides of these, as they're so much easier to grab on the table. The slanted ones encourage mini grabbing, and I like to avoid that. 

Then I used my dried coffee to add texture and smooth out the transition between the integrated base and the black base. 

I dry brushed the coffee with ruddy flesh, and then a blend of ruddy flesh and linen white.  Then I added spots of my flock mix, leaving good bits of the coffee ground cover showing.

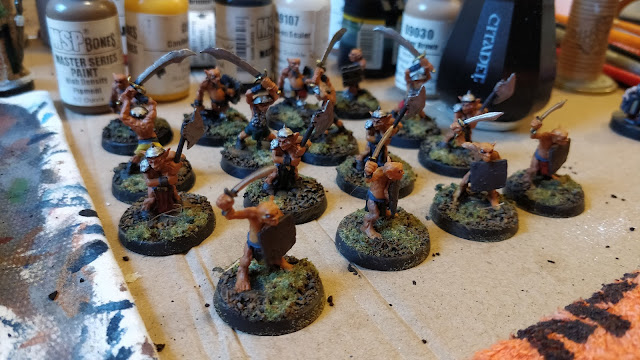
And there are my goblins! They're okay, but I was really unhappy with my choice to not line the minis. Not getting the skin coverage, and the easy black lining that comes with a good brown liner base was just frustrating. For the remaining goblins, I'm going to line them, but I don't know when it is I'll be getting to them. 

Next up on my paint tray are some sci-fi minis, as well as some treasure tokens. Plus I still need to finish Father Christmas...